The Beginning
It has been a long absent since the last post of my electronic project and hacks.Time to get my dusty arduino out of the shelf. G*! I don't know what to do with
this.
All i could remember is that i tried to get USBAspLoader up and running on my
Atmega8A-16PU. Ok, here is the deal. I write this article to aid anybody that
in my situation or maybe to refresh how to get USBAspLoader running.
SETUP
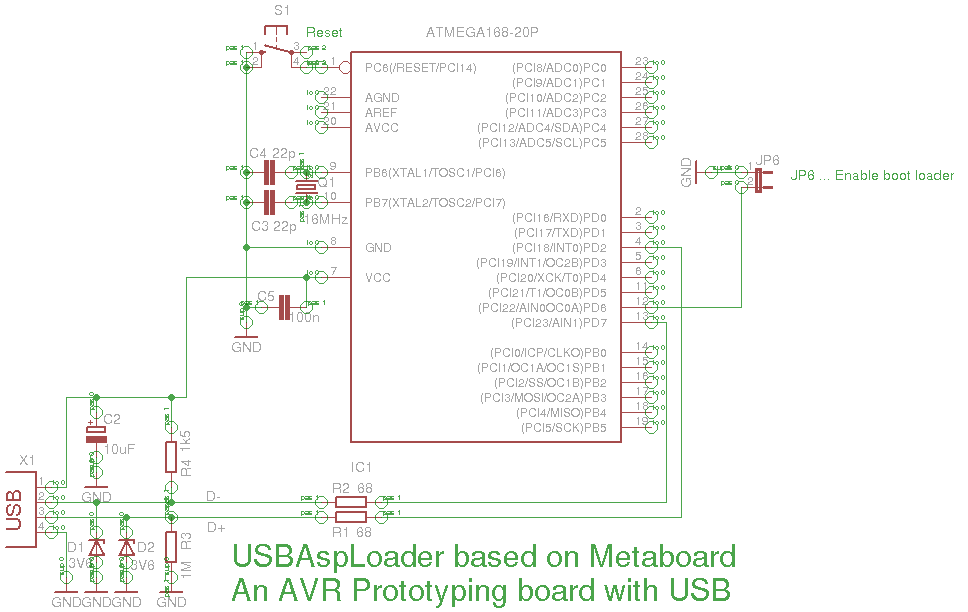
All Bill of materials are well described in the schematic below. Noticed i don't put100nF electrolytic capacitor between uC Vcc and GND. But i do add 10nF capacitor
at my soldered board. Why? Well i forgot to add one on my breadboard, sorry.
And here is the schematic.
Don't get confused of the uC label, Atmega168, is has the same pin layout with Atmega8.
With the schematic reading given me some clue the arrangement on the breadboard. Plug
the USB cable and my Linux (Fedora 19) detected as
kernel: [27618.902659] usb 3-3: new low-speed USB device number 2 using xhci_hcd
kernel: [27619.073587] usb 3-3: New USB device found, idVendor=16c0, idProduct=05dc
kernel: [27619.073592] usb 3-3: New USB device strings: Mfr=1, Product=2, SerialNumber=0
kernel: [27619.073594] usb 3-3: Product: USBasp
kernel: [27619.073596] usb 3-3: Manufacturer: www.fischl.de
Fiuh.. ok enough with the prototyping, it is time to move it to real soldered board.
Here is the minimum configuration to get the USBAspLoader working. And why
am i writting this article and to use USBAspLoader? Simple it is play well with arduino
and to upload/program a firmware or Arduino sketch file is blazing fast!
If you noticed that i only use USB connector as Power and Data in/out. That is the
power of USBAspLoader, it is so compact and minimum to be setup and running.
Troubleshooting
Here are some problems i had faced while setup USBAspLoader to run.
- Device detected as High Speed USB.
Usually the D- and D+ is swapped. Try to swap the connection.
The arrangement starts from Vcc, D-, D+ and GND. Check out this Wiki link - Device is unable to be enumerated. You have to check whether USBAspLoader
is uploaded correctly. Also the Jumper must be active low, connected to ground.
My jumper port is assigned to pin PD6. You could check it from the firmware,
since i compiled the firmware from scratch then the setup pin is located in ../usbasploader/firmware/bootloaderconfir.h just set the JUMPER_BIT
to any desired value. If you don't know what you are doing just check it
and leave it as default. If you see it is set to 6 then it refers to PD6 and if 7,
older version, then PD7. - The Device seems not responding although is already RESET.
Simply leave the JUMPER_BIT floating and then press RESET.
The bootloader will start bootloading the firmware which uploaded. - Device is restart by it self. Make sure the RESET pin of the uC has
a pull-up resistor. Simply add a 15k resistor between Vcc and the RESET pin.
UPDATE**
Hope this article would help. Keep soldering! :p


Comments